Teams - create and attend meetings - Kunnskapsbasen
Teams - create and attend meetings
This page explains how to create and attend video meetings in Teams.
Norsk versjon – Teams – opprett og delta i møte
Topic page on Teams|Topic page on Microsoft 365
NB! This user guide covers Teams for Windows 10.
Meetings in Teams
Each meeting in Teams has its own chat, storage, whiteboard, and meeting notes. These resources are available to all the meeting participants during and after the meeting. Teams has several smart tools that can be used in meetings, such as video background (blurry or others), screen sharing with or without sound and co-presentation of Power Points. Teams also has a waiting room function (similar to Zoom), but it only works for external participants. Meeting invitations in Teams mostly work the same way as in Outlook:
- All NTNU users are available in Teams and can easily be called in for a meeting. External users can join by a shared link.
- The meeting is shown in both the Outlook calendar and the Teams calendar.
- NTNU's lists of rooms are also available and it is thus possible to book meeting rooms for physical meetings at NTNU.
Setting up a meeting in Teams
There are two ways to set up a meeting in Teams:
- Using the Teams calendar
- Using Outlook
Set up a meeting in the Teams – calendar
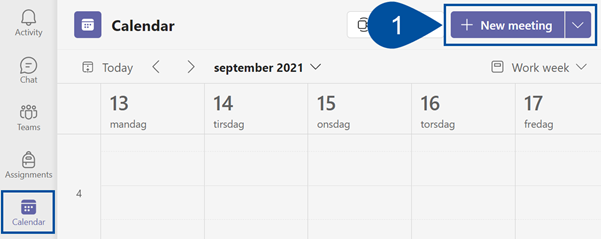
The calendar in Teams is the same as the one in Outlook – All activities registered in Outlook will also be shown in the Teams - calendar. In the Teams - calendar you can schedule meetings (or start spontaneous meetings).
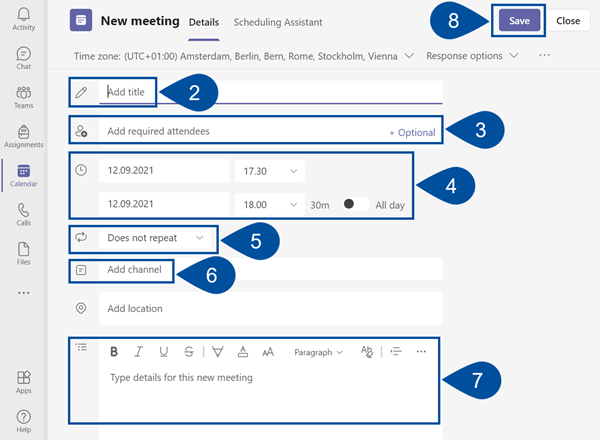
- Go to Calendar in the left menu in Teams. In the top right corner, choose New meeting (1).

- Give the meeting a Title (2).
- Use the Add required attendees (3) field to find NTNU users. You can also add optional attendees. If you add someone as an optional attendee , they will receive a meeting invitation as usual, but the meeting notice will be marked as optional. To invite an external user, enter the person’s email address.
Tip: You can use the Scheduling Assistant to check your calendar against the attendees calendars to find a suitable time for a meeting (works the same way as in Outlook). - Set the date and time of the meeting (4).
- If you want the meeting to be repeated on a regular basis, you can open the tab Does not repeat (5) in the selection menu. Here you can choose between different intervals such as every day of the week (Mon-Fri), weekly, monthly or custom.
- If you choose to add a channel in the Add channel (6) field, the meeting will be shared in the Posts tab in the channel. Everyone in the team is then invited to the meeting, and the meeting is added to everyone’s calendar.
- In the text box at the bottom of the page (7) you can leave a short description of the content of the meeting, for example the agenda. This makes it easier for optional attendants to decide whether the meeting is relevant to them or not.
- Click Save (8) to send the meeting invitation. Users with a Teams-client or Outlook can find the invitation in their calendar.
Set up a Teams meeting in Outlook
NB! Only in the Windows 10 app.
- Go to the calendar tab in Outlook.
- Click on New Teams Meeting at the top of the page. A link to a Teams-meeting is automatically created and added to the email.
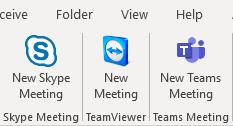
- Invite attendees and set the time like a regular meeting.
- Click Send.
How to join a Teams-meeting
If you have been invited to a Teams meeting, you have received a meeting invitation by email or the meeting have appeared in your Teams – calendar (if you have the Teams client installed).To join the meeting, you can:
- Join by clicking on the link in the email invitation.
- Join from the Teams - calendar (or Outlook calendar).
Join a Teams-meeting by invitation link sent to email
- Find and open your invitation email in your inbox. (If you have responded to the meeting invitation, the email may have been moved to the spam folder).
- Below Join on your computer or mobile app you choose click here to join meeting.
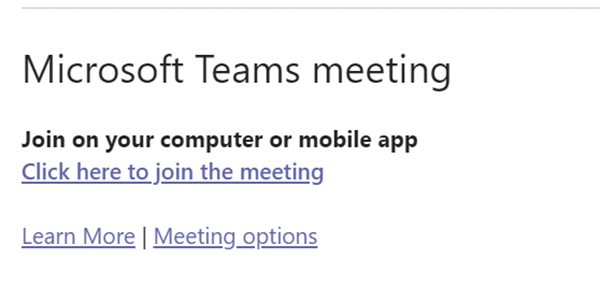
- You get to choose if you want to open the meeting in the Teams client or in the bowser. We recommend using the Teams client.
Join a meeting from the Teams-calendar
If you have already downloaded Teams client, your meeting invitation appears in the Teams - calendar.
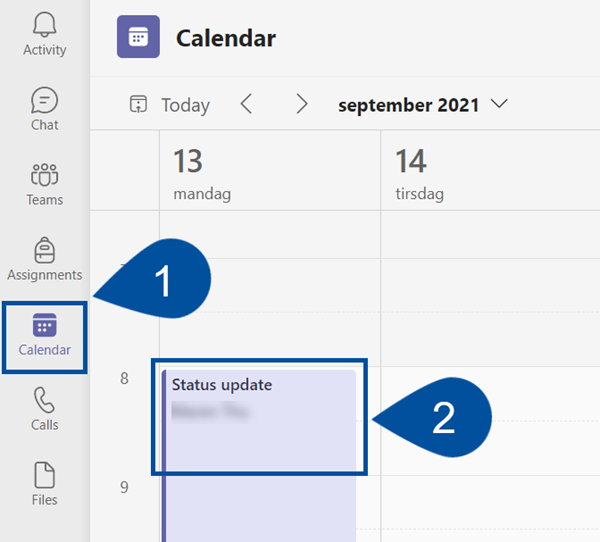
- Go to calendar in the left menu in Teams (1).
- Find the correct date, click on the meeting (2) and choose Join. (If you can't choose Join, the happening in the calendar is not a Teams meeting).
Record a Teams meeting
Start recoring of a Teamsmeeting
To start recording of a Teams meeting you click ... More, Record and transcribe, Start recording in the ribbon menu.

When you enter a meeting that is being recorded, you will be notified that your camera and microphone are disabled. To activate them, you must agree to be recorded.


When recording of a Temas meeting you are active in starts, the camera and microphone will be disabled. Participants will then be prompted to accept recordings if they want to activate these.

Saving and auto-deleting Teams meeting recordings
Teams meeting recordings are saved in the Recordings folder on the owner's OneDrive. This recording is automatically deleted after 60 days. To postpone deletion, the owner must open the recording in Stream and choose how long the recording should be kept. Here you can also download the recording by pressing ..., Download in the ribbon menu.


Meeting tools in Teams
Meetings in Teams include several tools. The tools can be found in the menu bar at the bottom of the meeting window.

(1) Participants overview
The participants overview shows a list of the meeting attendants. It is possible to add participants during the meeting through the search box at the top of the participant list or by copying and sharing the meeting link. You can also download a list of the meeting participants. This list will solely contain the attending participants during the moment of downloading.
(2) Meeting chat
The meeting chat works the same way as the regular chat in Teams. The chat is stored and accessible to all attendees after the meeting has ended.
(3) Reactions
Here you can express reactions as emojis. You can also signalize that you want to speak by raising your hand. When you raise your hand, a hand will appear besides your name in the participant list and a yellow frame will appear around your video/picture.
(4) Breakout Rooms
Divide your meeting into separate meetings. Groups size and participants can be chosen automatically or manually.
(5) More actions
More actions give you several useful functions.
Device settings
Here you can change the camera, audio and microphone.
Meeting options
Here you can choose several settings for the meeting. Choose whether you want participants to join your meeting with or without requiring your permission. Here you can also choose which participants that have permission to present during the meeting.
Meeting notes
Each meeting in Teams include a wiki page to write and save meeting notes during the meeting. Each meeting in a recurring meeting series gets its own section in the meeting notes. After the meeting has ended, you can find the notes by opening the meeting in the calendar (or find it in the Teams - chat).
Meeting info
Here you can find the link for the meeting that can be used to invite other people to the meeting.
Views
You can choose between the view’s Gallery, Large gallery and together mode. You can also choose between Fullscreen, Focus and Gallery at Top. Focus means that you get a large video of the person talking.
Apply background effects
Here you have the option to activate a virtual background. You can use predefined from Teams or upload your own.
Turn on live caption
Participants can choose to turn on live caption. Be aware that this only works for English.
Make a recording
You can make a recording of the meeting or parts of the meeting. The recordings are saved on Microsoft OneDrive for the person who started the recording, and a link to the recording appears in the meeting chat. It is only possible to make a recording in a meeting, not a call. If the option is greyed out you are probably in a call and will need to instead create a meeting.
In OneDrive, you can easily share the recording via a link, email the link or download the recording. You can find Microsoft OneDrive by opening O365 from Innsida. If you record a meeting where an entire Teams channel is invited, the recording is saved in the channel’s Share Point. All files are saved in mpeg4-format.
Note! Although the meeting participants can see when a recording is being made, it is important that you let them know before you start recording. Make sure that you follow the GDPR.
(6) Camera
Turn off or on your camera.
(7) Microphone
Turn off or on you microphone.
(8) Share content
The share function allows you to share your screen, a window, a Power Point or a Microsoft whiteboard with the other participants.
Share a Power Point
When sharing a Power Point in Teams the other participants can navigate through the slides on their own. You can prevent this by clicking on the eye in the slide menu. Other participants can take control of the presentation at any time.
Give control to other participants
When you share a screen or a window, you can give control over the screen to other participants in the meeting. They will then be able to navigate through and interact with your screen, and you can see their movements on the screen. Participants can also, at any time, request control.
When you share a screen or a window, a menu appears on the top of the window. Here you can choose which participant that get to control your screen. 
See also
Contact
Orakel Support Service can help you if you have questions or encounter difficulties.