OneNote - Files and multimedia - Kunnskapsbasen
OneNote - Files and multimedia
On this page, you will find information on how to add files, images, videos and audio notes to your notebook.
NB! This guide describes functionality from OneNote for Windows 10.
Norsk versjon - OneNote – Filer og multimedia
Innholdsfortegnelse [-]
Microsoft 365 topic page | OneNote topic page
Add a file
Inserting files in OneNote makes it easy to keep all your notes in one place. You can add a file as an attachment, which creates a clickable link you may open from OneNote, or you can insert the file as an image.
Add a file as an attachement
When inserting a file as an attachment, you are making a copy of the original file. These files are *not* connected. Any changes you make to the file uploaded in OneNote will not appear in the original.
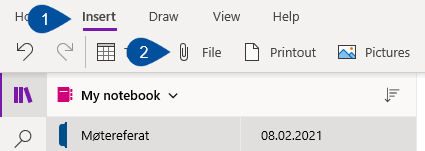
- Click the Insert tab (1) then click File (2).
- Locate the file in the pop-up window and select Open.
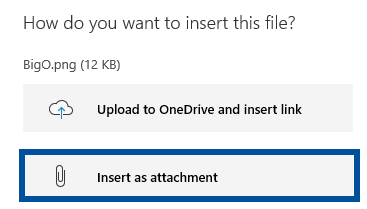
- In the following pop-up dialogue box, select Insert as attachment.

- he file will now be added to the OneNote page with a name and an icon showing the file type.
Add a file as a printout
When you add a file as a printout, the contents of the file will be added to the page as an image. You can move the image, but not edit.
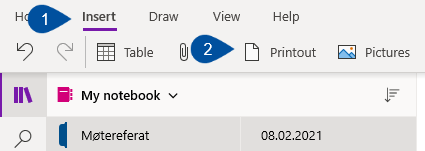
- Select the Insert tab (1) then click Printout (2).
- Locate the file in the pop-up window and select Open.
NB: Microsft 365-files that are not in PDF format will be converted to PDF, and you will get an icon for each file type.
Upload link to OneDrive
You can insert a file by uploading it to your OneDrive account. This will add the file to your OneDrive and create a link to the file on the OneNote page. A preview of the file’s content will be shown on the page. Selecting this option reduces the file size of the notebook, as the source file is stored on OneDrive.
- Select the Insert tab, then click File.
- Locate the file in the pop-up window and select Open.
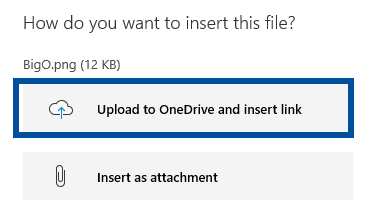
- In the following dialogue box, select Upload to OneDrive, and insert link.

- The file will now be added to the page with a link. Clicking this link will open the file in OneDrive, where you may edit the content.
Adding a picture
You can add a picture to any page in your OneNote. There are three options to choose from: from your computer, from camera, or from an online source.
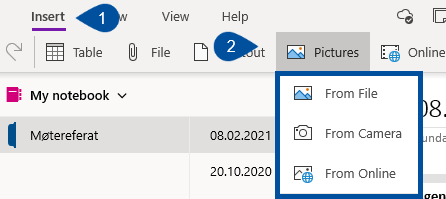
- Select the Insert tab (1), then Images (2), and select:

- From file if you wish to insert a picture you already have on your computer.
- From Camera if you wish to take a photo, for instance of a blackboard or presentation slide in class and insert it directly into your page. This option only works if you are using a device with a camera. Depending on your device, it may be possible to make simple edits to the photo before inserting it.
- From Online if you wish to insert one from the internet. Selecting this will make a sidebar pop in from the right, where you can search the web for pictures using Bing.
Editing images
To edit an image, select it by clicking. This will make a new tab called Picture (1) appear, which presents several options for editing. You can:
- Rotate picture 90 degrees right or left.
- Flip the picture either horizontally or vertically.
- Write an alternative text. This option allows you to give the picture a title and a description. Writing a good description is important for the accessibility tool to function properly. Read more about accessibility here: Accessibility tools, or at Universell utforming av IKT ved NTNU (only in Norwegian).
- Set picture as background. This means you may write text on top of the picture.
Adding an Online Video
By adding a video on the page, you will be able to play it without having to open a browser.
- Locate the video you wish to use and copy the video link. If the video comes from a site like Vimeo or Youtube, open the video and copy the URL from the address bar.
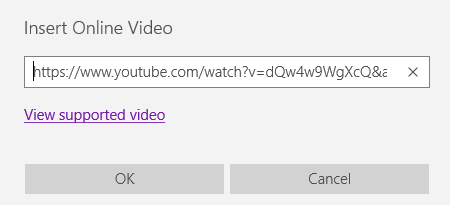
- In OneNote, select the page you want the video to appear on. Then select the Insert tab (1) and click Online Video (2).

- Paste the URL into the pop-up dialogue box and click OK.
- The video will now be added to the page, in addition to a link to the video’s online location.
Adding a video from your computer
To add videos from your computer, you have to add them as files. The video will be added to the page as an icon with a file name. Double click on the icon to view the video. NB: Maximum file size is 50MB.
Alternatively, you can upload your video file to Mediasite and then insert the video as a link, as described above. See Save and share videos with MyMediaSite.
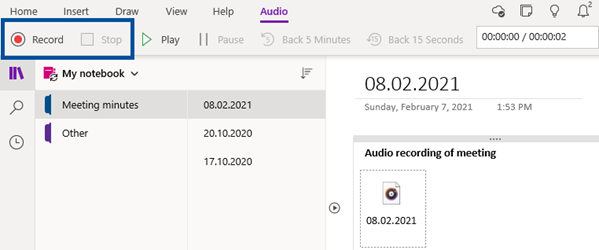
Recording Audio
You can record audio notes directly in OneNote. The audio file is automatically added to your page as an icon, and you can play it from there. You can also play it using your own media player or save it to your computer.
- Click the OneNote page where you wish to place the recording.
- Select the Insert tab and click Audio (1). OneNote will start recording audio. When the recording starts a timer will appare in the Recording tab. The recording will continue even if you start working in another window.

- To stop the recording, click Stop in the Recording tab. Click Record to restart the recording.

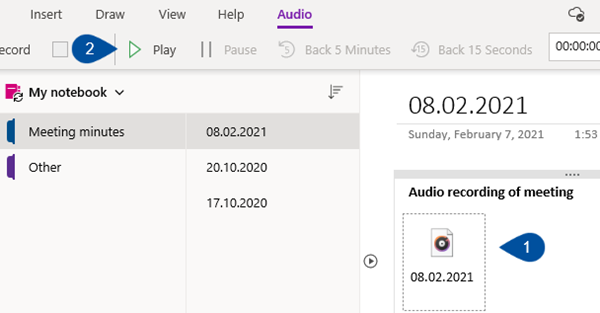
- To listen to the recording, either double-click the icon (1) of the recording you want to hear, or click the Play-button (2) in the Recording tab.
Writing notes while recording
If you write notes while you are recording, you can later locate at which point in the recording you made a note. To do this, hover the mouse over your notes, and click the little Play icon which appears in the left margin. This will start playing the recording at the time that corresponds to when you wrote the note.
Saving a recording locally on your computer
Should you accidentally delete your recording from the OneNote page, it is lost and not possible to recover. Because of this, you may want to save a copy of the recording to your computer.
- Right-click the recording icon.
- It the appearing menu, click Save as.
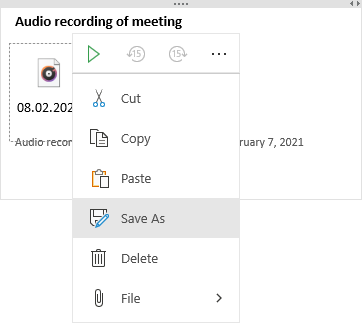
- Choose where to save the audio file.
See also
- Handwriting and drawing
- Math tool
- Notebook - sections and pages
- Collaboration and sharing
- Accessibility tools
Contact
Orakel Support Service can help you if you have questions or if you encounter difficulties.