Blackboard - Introduction to Collaborate - Kunnskapsbasen
Blackboard - Introduction to Collaborate
This page give you a basic introduction in Blackboard Collaborate.
Norwegian version - bli kjent med Collaborate
Theme page for Blackboard / pages marked with Blackboard
What is Blackboard Collaborate?
Blackboard Collaborate is an easy and reliable tool, designed for education and training. Collaborate works as a virtual classroom, and gives the opportunity to share applications, in addition to use digital collaboration tools to facilitate student-based learning.
Note: Blackboard Collaborate is not a suitable tool for streaming between physical rooms on campus.
Benefits With Collaborate
- Collaborate is directly integrated into Blackboard and thus will not require access to other applications. Collaborate does differ to what degree different browsers are supported, this means functionality between the different browsers are notable. Vi recommend that you use Google Chrome, because it gives the best support for both PC/Mac and mobile. You can read more on browser support here: Browsers support.
- It is easy to give external users access by distributing guest links. This gives guest lectureres the opportunity to have their lectures through Collaborate.
Access to Collaborate
It is possible to access to Collaborate in the following ways:
External users
All sessions in Collaborate will have a unique URL, which can easily be shared as a link with external participants. The one who creates the session can decide which privileges that will be gives as default for guests by role: participant, presenter or moderator. It is also possible to change the role for each individual guest during a session.
Access for NTNU users
Lecturers will find the tool in the Course Management / Course Tools in their courses:
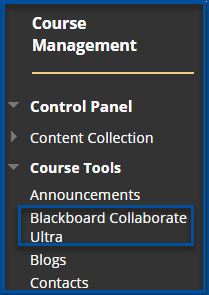
- In order for the students to be able to access Collaborate, you as a teacher have to make the tool available in the course menu. This will ensure students to have open access to the tool. From the fall 2020 semester all courses will be created with Collaborate added to the course menu.
- Access for groups: it is also possible to have Collaborate as a tool when you create a group or a group set in Blackboard. This ensures that each of the groups will have their own Collaborate-room.
- Time-limited open sessions: lecturers will also have the opportunity to create sessions in Collaborate and share links to time-limited or open sessions with the students.
User interface
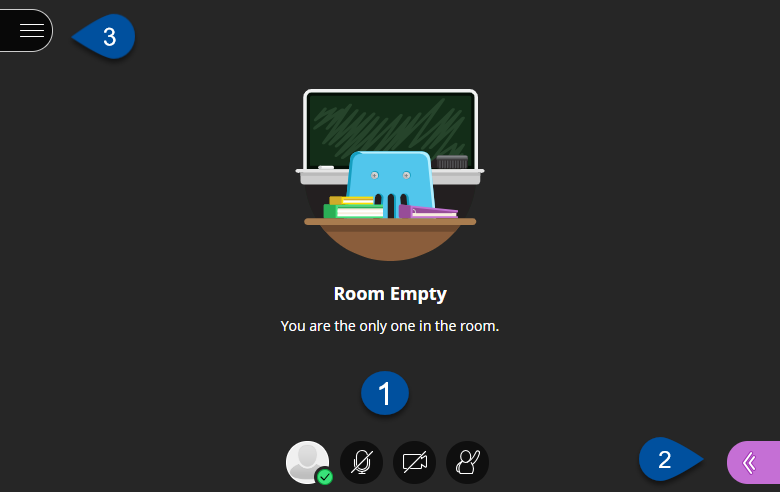
Collaborate is differentiated into three main parts: Media space (1), Collaborate panel (2) and Session menu (3).
The Media space
Session content
The Media space in Collaborate is where the shared content shows. The content you share is automatically the main focus on the screen. The Picture-in-picture feature shows at all times who is talking. If no content is shared, the focus will be on the participant pictures and video. It is possible to switch between grid view and a view that follows the speaker.
Tools in the Media space
Down in the middle of media space you can find different tools:
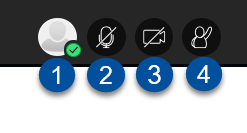
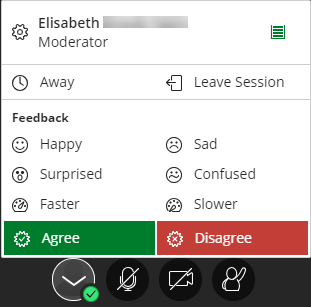
- Status and profile picture (1) - By clicking on the green status icon you can give feedback on how you experience the session, you can also set tour status to away or leave session.
- It is possible to activate the microphone (2) for a participant to share audio. The same tool can be used to configure the microphone settings.
- The participants can activate their web camera (3). Use this tool to configure the camera with the correct settings.
- Raise your hand (4) to answer questions or to get attention from the presenter. The hand can be taken down by clicking the tool again.
NB! Notice that the moderator has the privilege to “take down hands” and also override the microphone and camera sharing from participants.
Collaborate panel
In the lower right corner you see the Collaborate panel, the panel is closed when you enter a session. You can open the panel by clicking on the little purple icon with two left pointing arrows. You will then get the following options: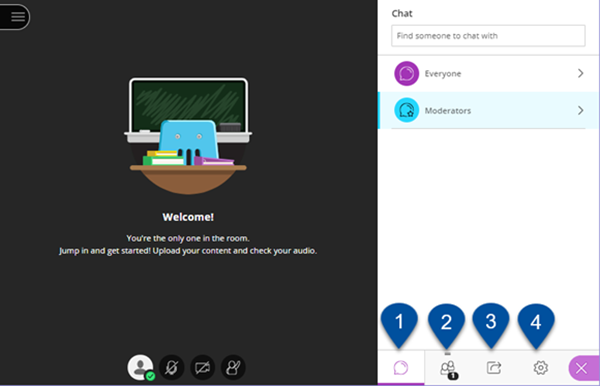
NB! The content of the menus will depend upon which role you have in the session: moderator, presenter or participant.
- Chat: everyone have accesses to the common-chat, and it can also allowed for private chats between participants when you create a session. In additions the moderators have their own moderator chat. Notice:// The moderators have the option to see all the privates chats. The chats will also be recorded and the moderators have access to it afterwards. All the participants must be informed about this before the session starts.
- Participants:
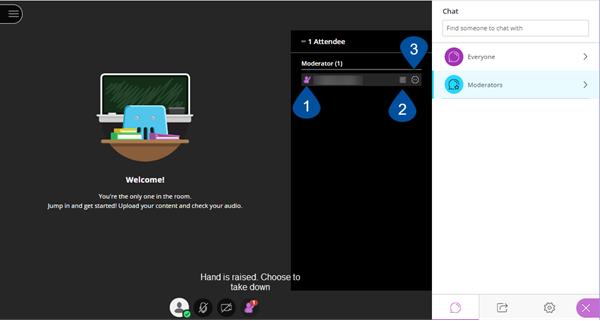
The Participant Panel gives an overview of all the current participants of the session. It shows the participant's status along the way. It is possible to drag and drop the Participant panel to the media space. Than you have overview over the chat and status in one and the same picture. This is recommended for everyone who will moderate a session in Collaborate. You will also see these features in the Participant panel:
- The participant has raised a hand.
- Status and the quality of the internet connection.
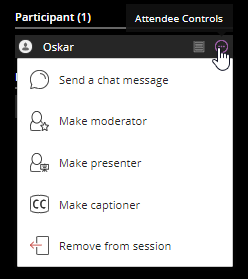
- Participant settings which is available for moderators.
Share the content menu (3) in the Collaborate- panel gives following options for the moderators and the presenters: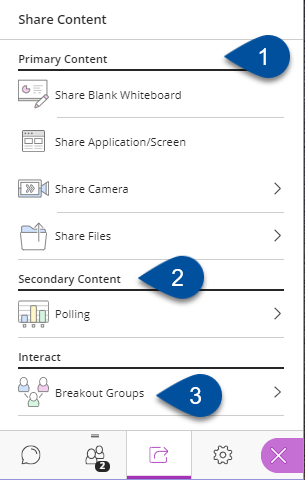
Through the share content panel moderators and presentors can choose between different types of content to share. The different types can be separated into three categories: primary content, secondary content and collaboration.
- Primary content has 3 different tools.
- Share whiteboard with the option to let participants write and draw on the board.
- Share application/screen which is the recommended way to share files from your computer, example Powerpoint and PDF files, as well as installed software.
- Share files - lets you upload and convert files like PDF, Powerpoint, GIF, JPEG and PNG til the Collaborate file format.
- Under secondary content you can find polls. This tool can be used in activating the students by putting in a task. We recommend for you to use a slide with the question and up to 5 alternatives. You then activate the pool, and let the students submit their answer.
- Under collaboration you will find breakout groups which is a tool which lets you send participants into smaller groups. The moderator assigns the participants a group. In the group participants can collaborate by using the whiteboard, share audio and video. Moderators can freely move between groups and answer questions. In addition moderators choose when to stop the breakout groups, this will send all participants back into the main room.
Read more about the different tools in Blackboard Collaborate - Tools in Collaborate
Session Menu
On the top to the left in media space you find the session menu: 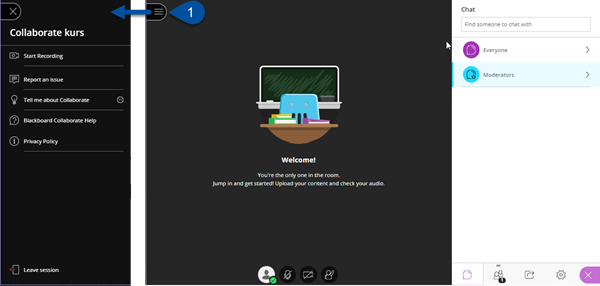
- The moderator can start and stop recording from the session menu.
- Report a problem to Blackboard.
- In "Tell me about Collaborate" can you find short training resources for:
- Introduction to Collaborate.
- Information about private chats.
- Blackboard Collaborate help takes you to Blackboard Collaborate Ultra Help
- Privacy policy takes you to Blackboard Privacy Statement
- Leave session is where the participants can leave the session.
See also
- Blackboard Collaborate with the Ultra Experience
- Attendees
- Manage Attendees
- Accessibility in Collaborate Ultra
Contact
Orakeltjenesten can help you if you have any problems.
