Print - FAQ - Kunnskapsbasen
Print - FAQ
Frequently asked questions about printing at NTNU.
Topic page on printing and copying | Pages labelled print
Norsk versjon - Utskrift - Ofte stilte spørsmål
Innholdsfortegnelse [-]
- Where can I find information about printing at NTNU?
- Can I print without installing the printer?
- Why isn't the printer working?
- What are the requirements for printing?
- Which print queue should I use?
- Why isn't my card recognized by the printer?
- Can I print without logging in?
- How can I print in colors?
- How can I print single-sided?
- What to do if my print job fails?
- What happens if I empty my print quota?
- Why can't I print PDFs?
- Related articles
- Contact
Where can I find information about printing at NTNU?
Please visit the topic page on printing and copying.
Can I print without installing the printer?
Yes, documents uploaded to *myPrint* may be printed immediately on all printers with card readers at NTNU.
Why isn't the printer working?
Often, the printer not working is due to it being out of print supplies such as paper or ink. These supplies should be available next to the printer and can be replaced by the user.
The printer should tell you why it doesn't print if you press Check Status / Kontroller Status.
If the printer isn't out of paper or ink, but still returns an error message, please contact Orakel Support Services.
What are the requirements for printing?
- Your device needs to be connected to the NTNU network, either by connecting to the wireless network eduroam or wired connection on campus, or by VPN.
- You need to have a valid identification card issued by NTNU, visit the Innsida article on identification cards if you need one.
- Students need to have enough funds in their print quota to cover the costs of their printing.
Which print queue should I use?
The queue is named NTNU-Print.
You may fetch your print jobs on all printers connected to followprint (printers at campus with card readers).
Setting default print queue - Windows
- Open "Control Panel", this can be done by pressing the Windows button and entering "Control Panel".
- Select "View devices and printers".
- Right click your preferred print queue, e.g. "NTNU-Print".
- Select "Set as default printer" or "Sett som standard".
Setting default print queue - macOS
- Open "System Preferences".
- Go to "Printers & Scanners".
- In the "Default printer" menu, please select your preferred print queue, e.g. "NTNU-Print".
Why isn't my card recognized by the printer?
Your card is equipped with a MIFARE identificator. This identificator is tied to your user account, which is why your documents appear on the printer when you tap your card to the printer's card reader. This means that if your card isn't recognized it's probably not correctly registrered in our systems. Please contact your NTNU identification card issuer.
Please note that you will not be able to print the day you receive your NTNU identification card.
Can I print without logging in?
No, you will need to log in to the printer. Normally this is done by tapping your NTNU identification card at the card reader on the printer. It is also possible to log in by swiping left or right at the printer display and enter your regular NTNU username and password.
How can I print in colors?
Due to cost consideration, NTNU printers are by default configured as black and white printers.
You may change this. Please note that printing in black and white is more economic for students with print quotas.
Color printing - Windows
- Open the print menu in your program (e.g. by pressing "Ctrl + P")
- Open "Printer Properties" or a similar menu.
- Select "Color" where possible.
- Click "Save" or "OK".
Color printing - macOS
- Open the print menu in your program (e.g. by pressing "Cmd + P").
- If using Google Chrome, select "Print using system dialogue" in the window that appears.
- Choose "Printer Features" as shown below:
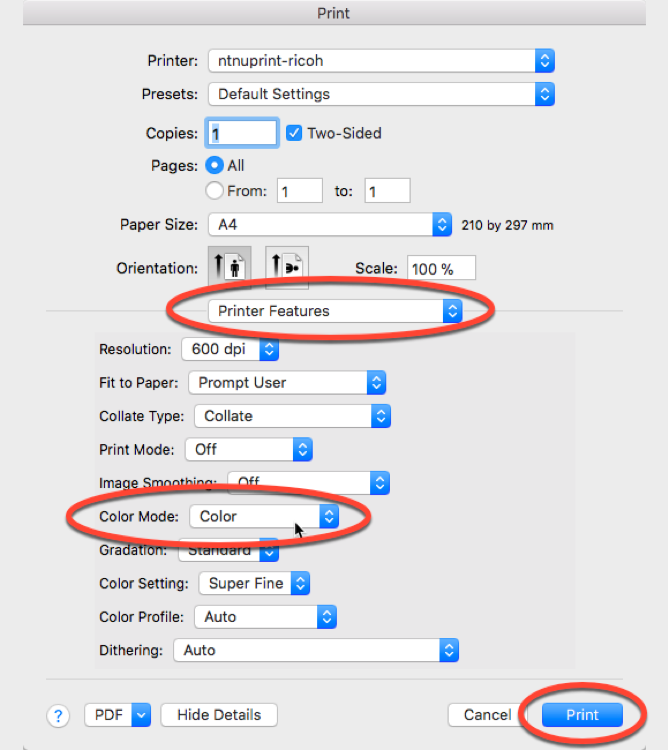
- You may select "Color" or "Black and White" in the Color Mode option.
- Press "Print".
How can I print single-sided?
Due to cost consideration, NTNU printers are by default configured as duplex printers. You may change this. Please note that the printing quota for students is deducted per sheet and not per page, duplex printing is therefore more economic.
Single-sided printing - Windows
Instructions for single-sided print in Windows varies a lot, the following is the system way:
- Open the print menu in your program (e.g. by "Ctrl + P")
- Click the "Preferences" button
- Choose "Off" in the option for 2-sided print.
- Press "OK" or "Save".
Single-sided printing - macOS
When using Mac with our print queues, documents are printed single-sided by default.
If you want duplex printing with Mac OS X you will need to check the setting for "Duplex printing" when installing the print queue.
This setting may also be changed using CUPS after installing, but it may be easier to install the printer again.
What to do if my print job fails?
If a print job fails due to technical errors with the printer, we recommend that you remove any remaining print jobs from the printer. The procedure for this varies a lot from printer to printer, but normally you can press the info button and find the jobs in a tab there. Then find your print job, press it, and choose "Delete". If you fail to do this, your documents may be printed later.
If your print job is damaged, please contact Orakel Support Services.
What happens if I empty my print quota?
Print jobs may not be finished if you empty your quota while printing. Ricoh printers will print until you reach zero and then cancel the rest of your print job.
Students may not be able to log in to the printers while their print quota is below 0,75 kroner. The quota may be refilled through our online payment solution.
Why can't I print PDFs?
We have observed some issues with print jobs coming from various web browsers such as Internet Explorer and Google Chrome. We are therefore recommending printing with Adobe Acrobat. To make this easier, you may change the default application for opening PDF files. This is done as described below:
Change default PDF application – Windows
- Make sure Adobe Acrobat is installed.
- Locate a PDF file and right click it.
- Hover above "Open with".
- Click the "Choose another app" option that appears.
- Select Adobe Acrobat Reader.
- Check the "Always use this app to open .pdf files" option.
- Press "OK" to save.
Change default PDF application - Mac
- Make sure Adobe Acrobat is installed.
- Locate a PDF file and right click it.
- Hover above "Open with".
- Select "Other..." at the bottom of the list that appears.
- Select Acrobat Reader.
- Check the "Always use this app to open" option.
- Press "Open".
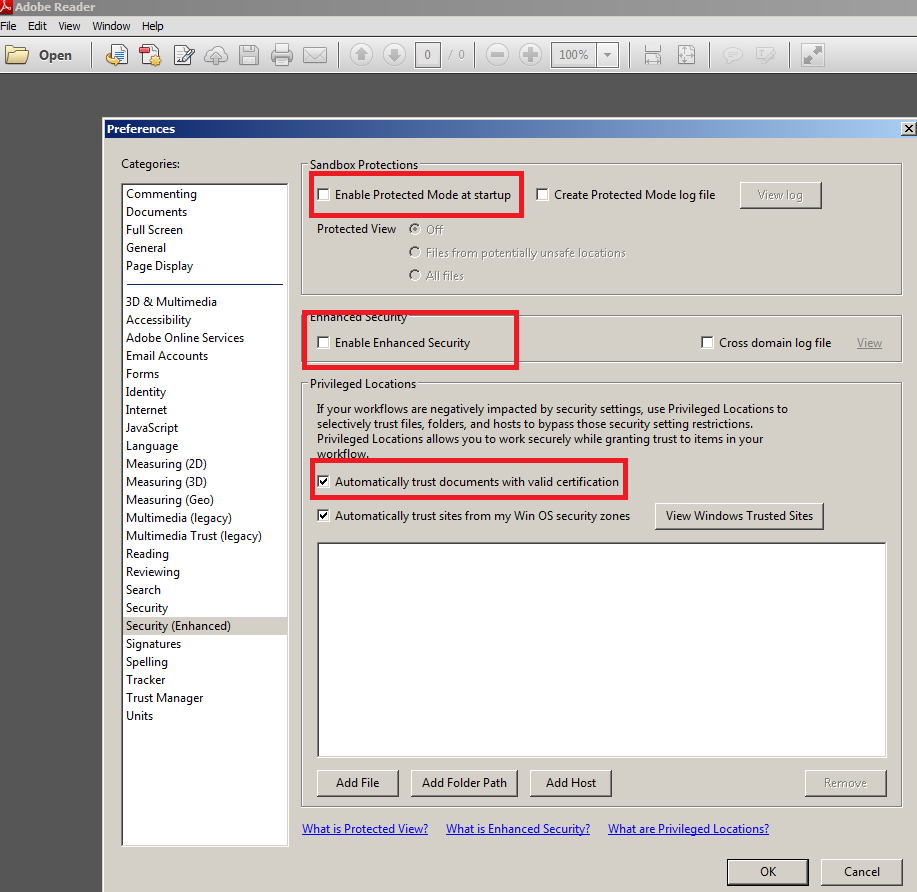
PDFs encrypted by Fileopen
If you experience issues with encrypted PDFs, please check that your Acrobat Reader settings for "Security (Enhanced)" match the image below:

Related articles
Contact
Orakel Support Services may help you if you have other questions.