Zoom - Maintaining control of meetings - Kunnskapsbasen
Zoom - Maintaining control of meetings
Here you can read more about how to maintain control of your Zoom meetings and administrate participants after the meeting has started.
Norsk versjon: Zoom - Holde styr på møter
Maintaining Control of Meetings
As the host or co-host of a Zoom meeting, it is your responsibility to maintain control of the meeting. Zoom has several built-in functions that only hosts and co-hosts have access to that can assist you with this. If you want to learn more about how to edit Zoom meeting settings before the meeting begins, click here.
Administrating Participants During a Zoom Meeting
Most of the tools you will need can be accessed by clicking the Participants button.
- Click Participants in the toolbar.

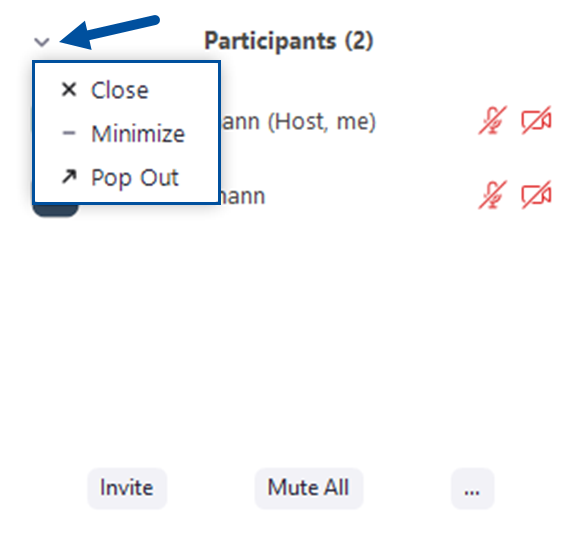
- (Optional): Use the drop-down menu to close, minimize, or separate the participants window from the rest of the client.

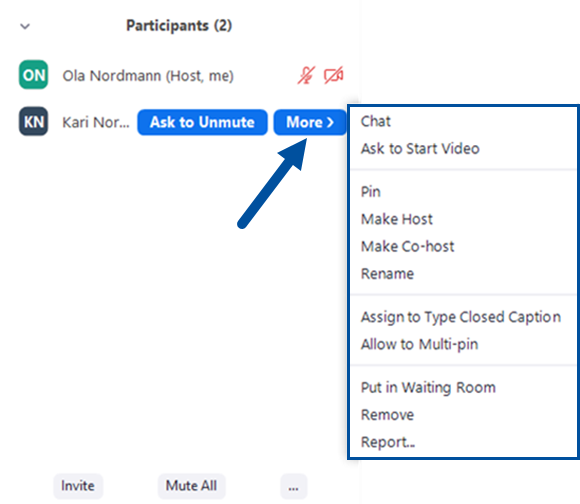
- By mousing over a participant in this window, you will have two alternatives. The first, Ask to Unmute / Mute will send a notification to the participant asking them to turn their microphone on or off. Click on More to access additional options:

- Chat: Opens a chat window where you can send direct messages to the participant.
- Ask to Start Video / Stop Video: Sends a notification to the participant asking them to turn their camera on or off. If the participant already has their camera on, you can stop their video display here as well.
- Pin: Pin the videos of up to 9 participants so that they will always be visible on your screen. This will not affect how other participants see their own screen and other participants.
- Make host: Sets the participant's role as host. Note that there can only be one host in the meeting, so this will relinquish your own host status.
- Make Co-host / Remove Co-host Permissions: Sets the participant's tole as co-host. There is no limit to the number of allowed co-hosts in a meeting.
- Rename: Change the display name of a participant that is shown to other participants in the meeting.
- Assign to Type Closed Caption: Administer rights to a participant to write captions.
- Allow to Multi-pin: Allow the participant to pin more than one participants' video. By default, participants will only be able to pin one video at a time.
- Put in Waiting Room: Place a participant in a virtual waiting room while you prepare the meeting. The host must enable the waiting room before the meeting in order for this option to be visible during the meeting.
- Remove: Remove the participant from the meeting. They will not be able to join again without your permission.
Administrate a Zoom Meeting
At the bottom of the participant list, you will find several options for administrating the Zoom meeting:
- Invite: Invite additional participants to the meeting.
- Mute All: Mute the audio from all participants in the meeting.
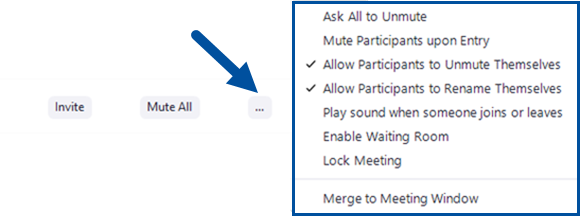
- Click on ... to access additional options:

- Ask all to Unmute: Sends a notification to all muted participants asking them to unmute themselves and turn on their microphones.
- Mute Participants upon Entry: Enable this option to automatically mute all participants by default when they enter the meeting.
- Allow Participants to Unmute Themselves: Enable this option to allow participants to turn their microphones on.
- Allow Participants to Rename Themselves: Enable this option to allow participants to change their own display name.
- Play sound when someone joins or leaves: By enabling this option, you will hear a tone when somebody joins or leaves the meeting.
- Enable Waiting Room: This option enables the waiting room Zoom function for your meeting.
- Lock Meeting: Enable this option to prohibit others from joining your ongoing meeting.
- (If you separated the participants window from the client) Merge to Meeting Window: Snap the window back to the main window for the client that is running your Zoom meeting.
Administrate Participants' Ability to Share Screen
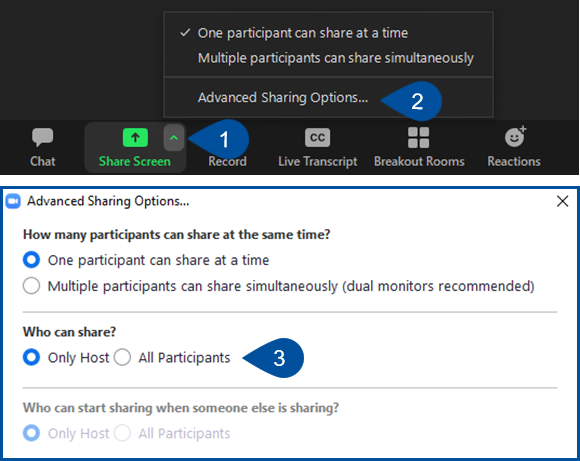
- Click on the arrow next to Share Screen (1) on the toolbar.
- You may choose to allow either one or multiple participants to share their screens at the same time.
- Click on Advanced Sharing Options (2) for more options. If you want only the host to be able to share their screen, click Only Host (3) under Who can share?

See Also
Contact
The Orakel Support Services can assist you if you encounter any problems.
Contact the Section for teaching, learning and digital services (SLD) for help with digital teaching through NTNU Help.
