Using MySQL at NTNU - Kunnskapsbasen
Using MySQL at NTNU
An introduction to creating and using MySQL-databases for students and employees.
Norsk versjon - Bruke MySQL ved NTNU
Looking for something else? Topic page about IT-support | Pages marked database
NTNU's servers run a MySQL database management system for students, and one for employees. MySQL is one of the most used and popular database servers, particularly for the web. Note that once you have created your MySQL-database it will only accept connections from an NTNU-network or through VPN. If you are new to MySQL, we recommend you familiarize yourself with the core concepts before you start using the service.
Concepts
User: A user is necessary to access a database. You can create multiple users, and the same user can access multiple databases. Your MySQL user must be the same user as your own NTNU username, or follow the following template: yourNTNUusername_something (f.ex. johndoe, johndoe_web, johndoe_calendar etc.). Please note that the maximum length of a MySQL username is 64 character, which means that if your username is johndoe (7 characters), you only have 57 characters left for the last section of the username.
Database: You can have multiple databases. Databases created can have the same name as your NTNU username, or follow the same format as MySQL usernames (with an added section, f.ex. johndoe, johndoe_recipes, johndoe_friends). As with MySQL usernames, a database can have a name length of maximum 64 characters.
Table: Databases can contain multiple tables. Tables can be named whatever you want, so long as no two tables in the same database are named the same. Tables contain the actual data in your database.
Permissions: MySQL users assigned to a database have permissions to execute various actions in a database.
Procedure
Before we start
Remember to replace username with your own NTNU-username for all steps in the guide below.
Students use:
- username@login.stud.ntnu.no
- mysql.stud.ntnu.no
Employees use:
- username@login.ansatt.ntnu.no
- mysql.ansatt.ntnu.no
Note for employees: The rest of the guide assumes that you are a student, remember to replace «stud» with «ansatt» if you are an employee.
Connect with SSH
Special permissions are required to create MySQL users and databases. On our servers, we run two small pieces of software (mysql-useradm and mysql-dbadm) which are used to create users, set passwords and permissions, and to create the database itself. This is Unix-software which you can access by visiting login.stud.ntnu.no for students and login.ansatt.ntnu.no for employees via SSH. Use your NTNU account information when logging in as shown below.
- First we need to open a terminal. Mac and Windows use different terminal-applications, but the rest of the guide after this step is the same regardless of your operating system.
- Mac: Open the application called Terminal
(Press cmd+spacebar and search for «terminal») - Windows: Open the application called Cmd
(Press the Windows-button and search for "Cmd")
- Mac: Open the application called Terminal
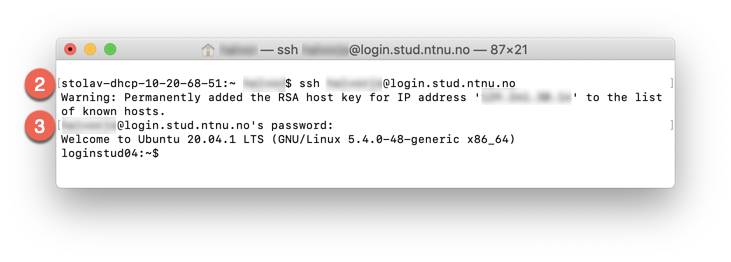
- Type in and run the following command: ssh username@login.stud.ntnu.no
- Type in your NTNU-password and press Enter
Note: While typing in your password it will be invisible.
Create a MySQL user
Say we are creating a database of our friends and their phone numbers. The first thing we do is create a MySQL user. We will call this user 'username_user1'. Make sure the full MySQL-username adheres to the requirements mentioned earlier(max 64 characters).
For example if your NTNU-username is username (8 symbols + 1 underscore), you only have 7 symbols available for the part of the name that you specify yourself. Remember to replace username with your own NTNU-username and "user_1" with something to your liking.
- Run the following command: mysql-useradm create username_user1
- Verify that your user was created by running the command: mysql-useradm show
- Set a password (max 8 characters) on your new user by running the command:
mysql-useradm passwd username_user1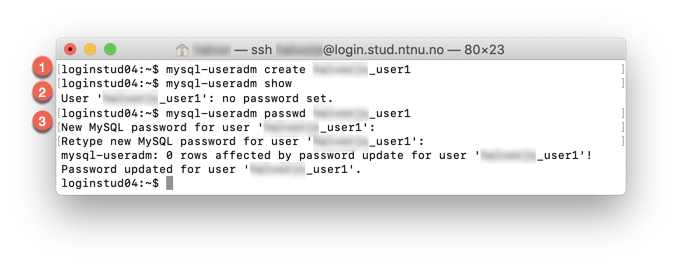
Note:
- The password should only be used for your MySQL-user, especially if you intend to use the new user for Web-purposes at NTNU. Files stored in your public_html-folder will be readable for all users at NTNU.
Create a database
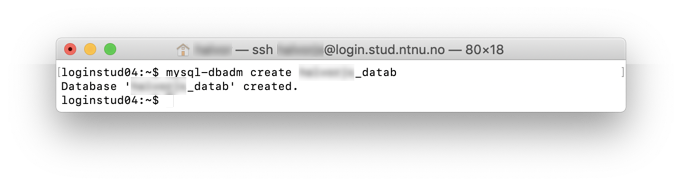
You can create databases using the administration-tool mysql-dbadm that not only lets you create, but also delete and edit the permissions to you database. For this example we will be creating a database called username_datab. Replace "username" your NTNU-username and "datab" with something of your choosing, but remember that the 64-character limit also applies here
- Run the command: mysql-dbadm create username_datab
Add user and grant permissions
Before we can begin using the database, we have to add our user to it and grant the user permissions.
- First we check the current permissions with the command:
mysql-dbadm show username_datab
- From the result we can se that there are no permissions currently granted to any users.
The permissions are edited in a text-editor that we will open within our current terminal window. The standard text-editor on the server is VIM, but this editor can be quite cumbersome for beginners, therefore we will instead use NANO.
Temporarily set NANO as the standard text-editor by entering the command: export EDITOR="/usr/bin/nano" - Now let us open the text-editor in our terminal by running the command:
mysql-dbadm editperm username_datab - Now that we have opened the text-editor in our terminal we can grant permissions to our new MySQL-user by first navigating to the line that says:
«# (no permissions currently granted to any user)» and deleting it (see image below). - Fill in as shown in the image; write "username_user1" under User, then press Tab and fill in Y in all the permission-columns, press tab to jump from one column to the next.
If you want to deny a user certain permissions you would write N in the corresponding column. In this example we grant our user all permissions, and therefore write Y in all columns.
- Press ctrl + X to exit, then Y to save and finally press Enter.
- Verify that the permissions where updated by displaying them again using the command: mysql-dbadm show username_datab
A correct result in this case will look something like this: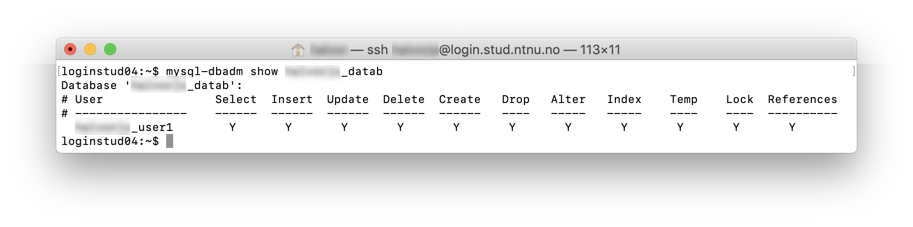
Create a table and add data
Now, we can begin adding contents to our database by creating a table and inserting data into it. Here we will create a table to store our friends names and their phone numbers.
PS: Everything done in this section can be done using the graphical interface: phpMyAdmin.
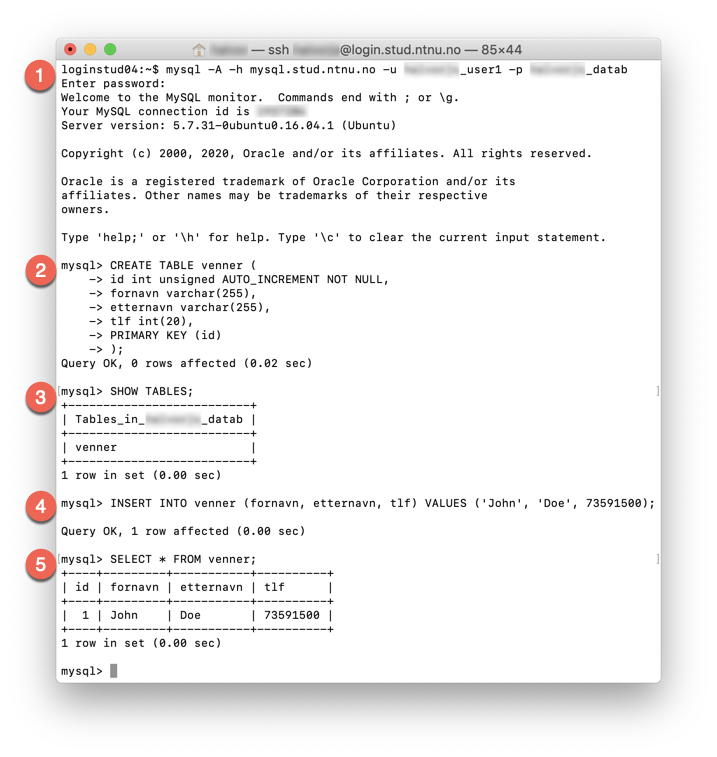
- First we need to connect to NTNU's MySQL-server with our new MySQL-user and its password, and select the database we just created. All this is done by running one command:
mysql -A -h mysql.stud.ntnu.no -u username_user1 -p username_datab - Paste in and run the entire command below, this will create a table with the name "friends" and the columns "id, firstName, lastName, number" change these names and datatypes as you wish.
CREATE TABLE friends (
id int unsigned AUTO_INCREMENT NOT NULL,
firstName varchar(255),
lastName varchar(255),
number int(20),
PRIMARY KEY (id)
); - Now that you have created an empty table you can view a list of all tables in your database by running the command: SHOW TABLES;
- Lets insert some data into the table by running the command:
INSERT INTO friends (firstName, lastName, number) VALUES ('John', 'Doe', 73591500); - If everything went well you can now view the contents of the table by running the command:
SELECT * FROM friends;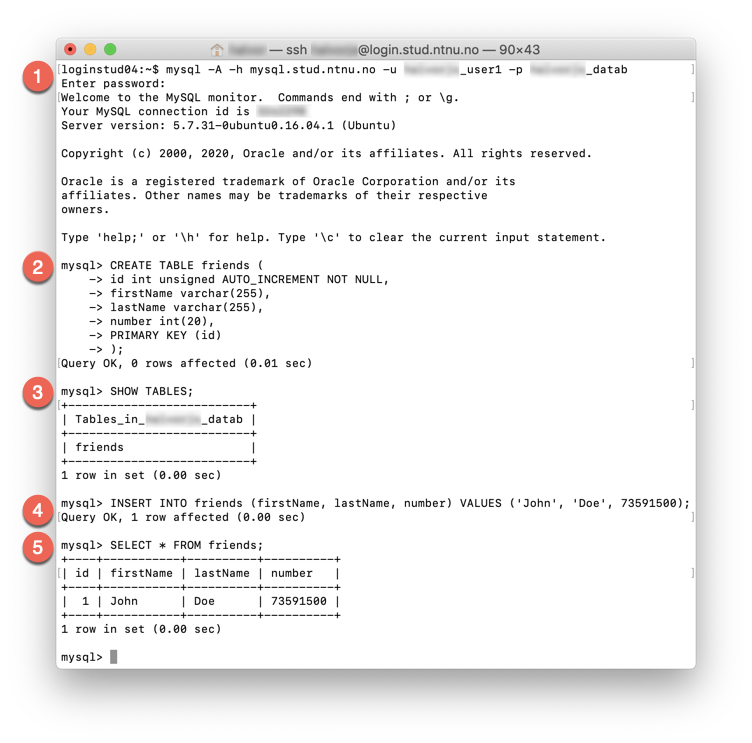
Congratulations, you have now created a database, a user with permissions to alter the database and a table containing data.
Note: Your MySQL-database will only accept connections from an NTNU-network or through VPN.
Database for Collaboration groups
Collaboration groups may only create databases and users for normal users, and databases whose names start with the name of the Collaboration group.
In other words, if you want to use MySQL in connection with a Collaboration group, you can create a database named f.ex. dance_test, if you are a member of the dance group.
Then, you can grant an existing (personal) MySQL user access by using mysql-dabadm editperm dance_test.
All members of a student organization group may add their own users to a database connected to the group in this way.
Graphical user interface: phpMyAdmin
If you want to use a graphical user interface to edit the database after it has been created, you can use NTNU's phpMyAdmin. Log in with the MySQL username and password you created earlier.
Tips and tricks
How to use the database with PHP
PHP has its own functions to access MySQL-databases. An example:
<?php
  $db = mysqli_connect("mysql.stud.ntnu.no", "johndoe_demo", "troll", "johndoe_friends");
  $result = mysqli_query($db, "SELECT * FROM friends");
  $row = mysqli_fetch_row($result);
  printf("First name: %s<br>\n", $row[0]);
  printf("Surname: %s<br>\n", $row[1]);
  printf("Phone: %s<br>\n", $row[2]);
?>
How to use the database with Perl
Here is a small example on how to use the database with Perl:
#!/usr/bin/perl
use strict;
use DBI;

my $db='databasename';
my $host='mysql.stud.ntnu.no';
my $user='databaseusername';
my $password='databasepassword';

my $dbh = DBI->connect("DBI:mysql:$db:$host", "$user", "$password",{PrintError => 0}) || die $DBI::errstr;

$dbh->do("SELECT 1 FROM tablename") or print $DBI::errstr;
More information on the use of the two administration-tools
Connect with ssh and then run the commands below :
- mysql-useradm --help
- mysql-dbadm --help
Two types of password encyption
MySQL has two ways of encrypting your password. If you haven't changed the password for your database user in a long time, the password might have old style encryption. This is not supported in newer clients like PHP7, which is used on folk.ntnu.no and org.ntnu.no. If this is the case you have to set the password for your database user again. The new password will be encrypted with the modern encryption method.
Contact
Orakel Support Services can help if you encounter difficulties. If you are an NTNU employee, consult your local IT Support.