How to submit your mobility grant settlement - Kunnskapsbasen
How to submit your mobility grant settlement
Within one month after you return from a sabbatical leave or academic travel, submit your financial settlement through the self-service portal.
Norsk: Oppgjør etter forskningstermin og stipendreiser
Topic: Sabbatical leave | Taxation during Research Sabbaticals and Grant-Funded Travel | Commuter status
Keep track of your expenses
Register expenses and receipts during your stay to keep track of expenses. You can either use the Self-Service Portal in your browser or the DFØ app to your mobile. Follow the instructions on this page.
Submit the settlement in the Self-service portal
To complete your expense claim, you need:
- your grant confirmation letter
- completed and signed commuter declaration form (xlsx)
- rent contract and receipts of paid rent
- first outbound trip
- last return trip to Norway
- moving costs
- entry costs (visa, vaccine, medical examination, etc.)
possibly:
- return travels for commuting (include receipts to assess commuter status).
- paid-up policy (for NTNU's mobility grant / sabbatical)
- educational grants (for NTNU's mobility grant / sabbatical)
Apply to NIRS for a paid-up policy and educational grant. Include the confirmation from NIRS in your settlement.
Log in and find your form
 Log in to the Self-service portal - choose English in the upper right corner
Use your Feide username and password (same as for NTNU).
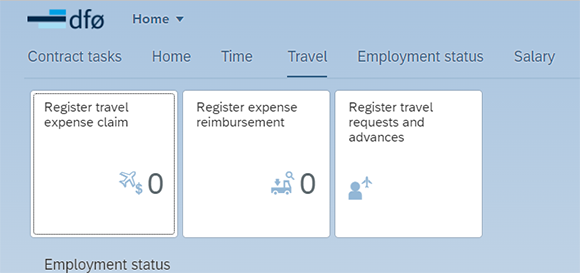
Go to the «Travel» tile
.png)
If you submitted your travel application in the Self-Service Portal before your stay
From 2023, use the Self-Service Portal before and after your sabbatical. Before your stay, send the form "Register travel application and advance". For more info,, see Travel advance mobility grant.
To start your expense claims, find your travel request in the Self-Service Portal and convert it to a travel expense claim. How to convert a travel request to a travel expense claim. You have now received a travel expense claim ready to be completed. Follow the instructions from "Expense report step by step".
If your stay started before 2023
If you didn't submit a travel request in the Self-Service Portal, create a new expense claim in the Self-Service Portal by clicking on the blue "+ Create New" button in the lower left corner. You will get an expense report form in five steps.
Expense claim step by step
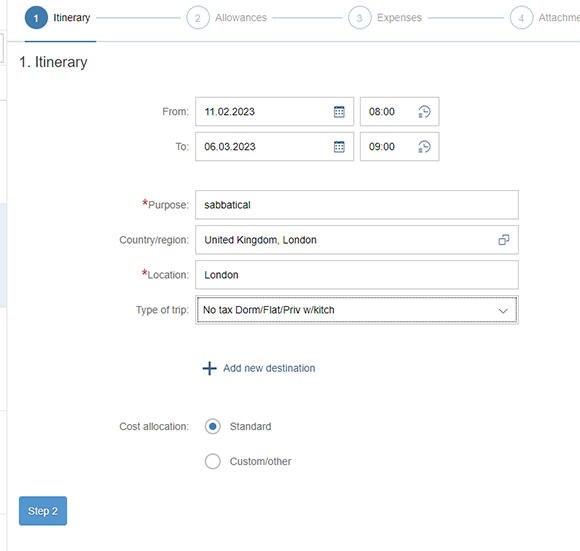
Step 1 – Itinerary
- Dates: Enter a fictitious date if you need multiple expense reports for the same period. Write real dates in step 5 comments. This is because the Self-Service Portal does not allow you to have multiple expense claims in the same period.
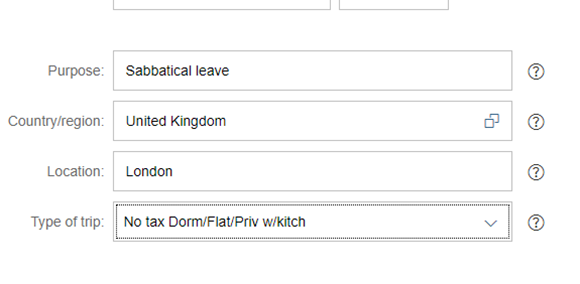
- Purpose: Describe the trip (e.g., sabbatical, academic stay).
- Country/Region and Location: Specify where you stayed. For multiple locations, select + Add new destination.
- Type of trip: Choose No tax dorm/flat/priv w kitchen

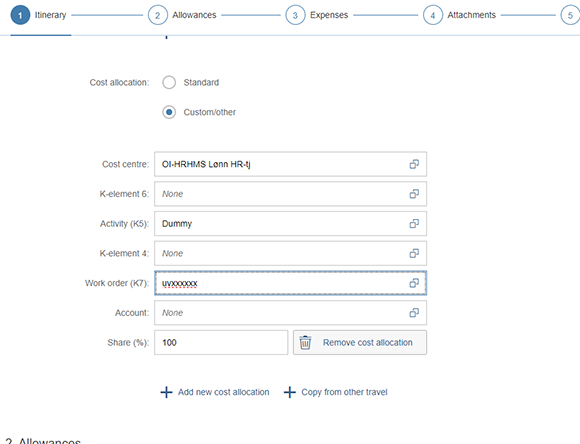
- Cost allocation: If your regular workplace covers the costs, leave it as "standard". For specific projects, check "other" and find the Work order K7 field. Type UV to see project numbers and names. The subproject number is usually in the grant confirmation letter. If you submitted a travel application, the cost allocation will auto-fill. If you don’t know what number to write, you can ask your financial officer for externally funded projects and controller for internal projects or talk to your immediate manager.

Step 2: Allowances
Skip this step. Do not select subsistence and compensation allowance, as this is normally not covered by mobility grants/sabbaticals.
Step 3: Expenses
Select + Add new expense post for each expense.
You can choose between two different types:
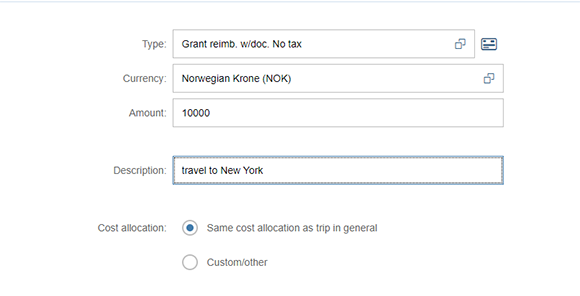
- Grant reimb. w/doc. No tax for documented expenses. Create one line per expense you have had and enter the field "Description". Upload vouchers for all expenses.
- Grant reimb. w/o doc. Tax for undocumented expenses. Enter remaining grant amount if not fully used. This is taxed.
Description:
- Travel expenses: Specify first and last trip details.
- Rent: Specify rental period and attach receipt. Upload the rental contract in step 4.
- Cost allocation: Charge specific projects for certain expenses. If all expenses are charged to the allocation, tick "same cost allocation as trip in general".
- Attachments: Upload receipt for each expense.

Step 4: Attachments
Ensure all attachments from step 3 are included. Upload additional documentation if needed.
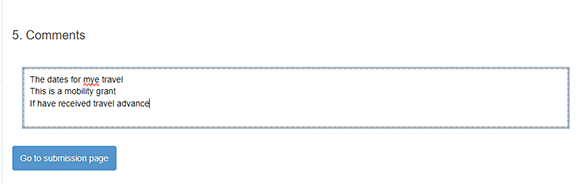
Step 5: Comments
• State your place of residence/country and actual travel dates/length of stay abroad to calculate the grant accurately.
• Specify if the expense claim is a grant, settlement, academic travel, mobility grant or advance.
• Check if a travel advance was paid earlier, so it can be registered in the payroll system.

In some cases there may be a difference between the documented and undocumented share of the grant. This difference must then be registered by the grant recipient as "grants without vouchers subject to tax deduction". Enclose confirmation of the amount allocated, e.g. in the form of a letter of allocation or other confirmation. At NTNU's mobility grant/sabbatical, the Service Centre can assist with calculating and register any undocumented share of the grant for disbursement.
Finally, tap "Go to submissions page." The form will then be sent to your immediate manager or employee with budget allocation authority (BDM).
Child Pages (2)
-
Commuter status
On this page, you will find information about what qualifies for commuter status during grant-funded travel and research sabbaticals. Norsk: Pendlerstatus Sabbatical topic page | How to submit your...
-
Taxation during Research Sabbaticals and Grant-Funded Travel
On this page, you will find an overview of what expenses are typically taxable and non-taxable in connection with research sabbaticals and grant-funded travel. Norsk: Skatt ved forskningstermin og...